Digital Imaging
for Stamp Collectors
by Don Denman
Identifying Stamp ColorsStamp Image Color Extractor
Introduction
Digital imaging has become an important aspect of philately. Computers, tablets and phones have become a common mode of communication for stamp collectors so it is important to understand how to properly generate, process, and share images. We first should start with understanding some of the common terms used in digital imaging.
Common Terms
Resolution – Image resolution is typically described in PPI or DPI, which refers to how many pixels or dots are used per inch of an image. It has a direct relationship to the sharpness and clarity of an image. PPI is used when describing images displayed on a screen, DPI is used when describing printed images. Scanners resolution is also usually discussed using DPI, scanners recognize the color at a specific row and column on the stamp as it is scanned. Here is a table of typical pixel sizes and dpi
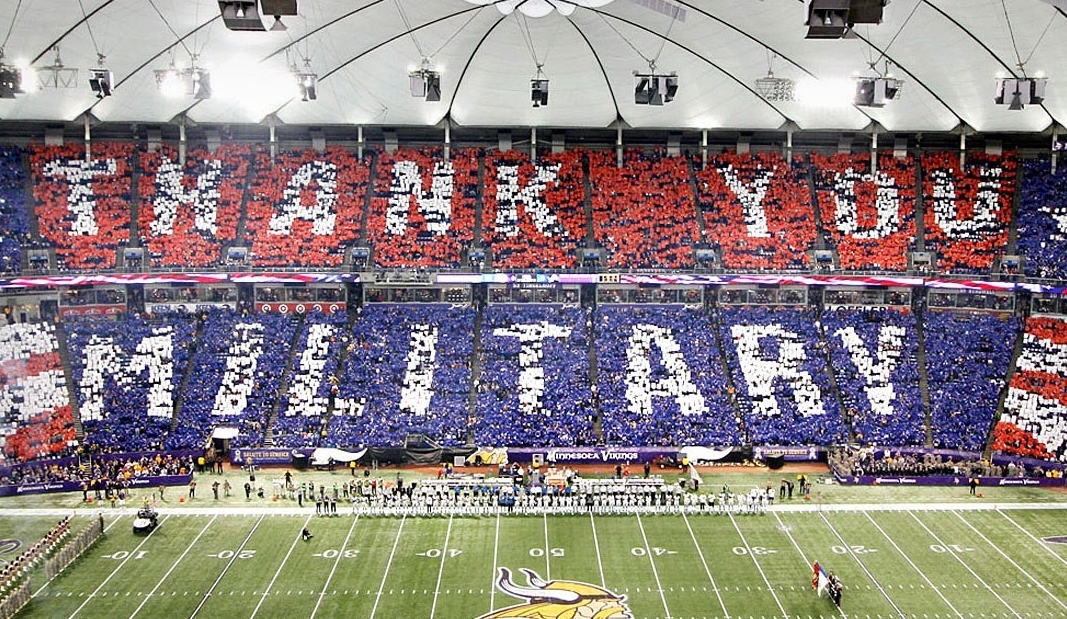
Pixel - An invented word derived from "picture element". It does not have a defined size but is rather the most basic unit of programmable color on a computer display or in a computer image. Digital images are made up of many pixels, all coming together to form the image we see. Pixels are more of an abstract representation of a specific coordinate, like a point on a map. A good way to think of pixels is to think of a crowd at a football game all holding up a card to form an image, each card can be thought of as a pixel.
Typical Display and Capture Devices
| Device | Pixel Size | DPI |
| Football Stadium | about 2 square ft. | 0.041 |
| Giant Scoreboard | about 1 ½ inches | 0.66 |
| 50 ft Digital Cinema Screen | about 1/3rd inch | 3.33 |
| Computer Display | about 1/75th of an inch | 75 |
| Computer Printer | about 1/300th of an inch | 300 |
| Digital Scanner | ~ 0.00083 inch | 1200 |
| Digital Camera | ~ 0.00035 inch | 3500 |

|
To determine the DPI resolution of your current display setting, measure the width of the red line above with a household tape or ruler. Consult the table at right to locate your measurement. The result will be about four inches on most monitors. This is a common measurement and explains why you will often see 75 DPI used when discussing display resolution. |
|
Megapixel – One megapixel is a million pixels and is often used to communicate is a unit of image sensing capacity in a digital camera. The higher the megapixels, the better the image resolution when displaying or printing an image in a given size.
Lossy – This is a term which means “with losses” and is often used to describe image file formats that discard data due to compression.
Lossless – The opposite of lossy, used to describe an image file format that retains all the data from the initial image file.
RGB – Stands for Red, Green, Blue and is a common color model used for display devices such as monitors. Each displayed color is determined by a combination of Red, Green, Blue.
CMYK – Stands for Cyan, Magenta, Yellow, and Black and is a common color model used in color printing process.
Bitmap – (Also known as Bit-mapped or Raster) Images which use pixels to describe the color. A notable characteristic of bitmaps is that larger images equals larger file sizes. Another characteristic is that a bitmap image cannot be rescaled without resulting in “pixilation”, or loss of definition in the details. Examples of file formats which are bitmap are JPG, GIF, BMP, PNG.
Vector images - Vector images are math, they use data to describe lines and curves. One of the greatest attributes of vector images is that they can be resized without “pixilation” or any loss of details. They are typically used for line drawings like logos and word art. Examples of vector file formats which are DXF, DWG, AI, and CDR. Vector files are outside the scope of this article.
File Formats
There are a number of ‘common’ bitmap file formats that support the exchange of images. There are also a number of proprietary bitmap formats (i.e. Photoshop PSD files) which fall outside the scope of this article. Each of the file formats have pros and cons and these tradeoffs are important to understand. The following formats detailed below are readable in both Windows and Mac OS operating systems and are supported by most image viewing and editing applications.
TIFF – TIFF is a lossless file format that is widely supported across operating systems. TIFF is the best file format for archiving high quality images since it does not lose any information. On the downside, TIFF file sizes are very large and they consume a lot of storage space.
JPG (or JPEG) - The JPG file format was specifically created for photographs and they support millions of colors. JPGs are by definition automatically compressed when you save a file. In many applications you can select the level of compression to match the desired level of image quality. JPGs are lossy, discarding information each time that they are compressed. The more the compression, the lower the image quality and the greater the reduction in file size. JPG are typically the preferred format for email and Web use.
GIF – GIF format is a compressed file format limited to 256 or fewer colors. They are generally not recommended for photographs but instead used for images like clip art. GIFs can be static or animated.
PNG - PNG, also known as Portable Network Graphics is a format which is designed to provide a higher lossless compression rate than other formats and to and help to reduce cross-platform differences in image display quality. The resulting file size is often quite large and this makes it less likely to be used in exchanging images or using on websites.
Generating Images
Producing a digital images can be done in several ways including scanning and cameras.
For many collectors scanning is the ideal method for generating images of stamps. A scanned image of a stamp will always be flat and without the possible distorting angle of a camera position.
A common mistake that people make is scanning
with lid open. This means that any ambient light entering the scan bed will
change how the scanner works. When scanning, the CCD array determines the
amount of light being emitted from the lamp and the reflected light from what
is being scanned. The scanning software uses averaging algorithms and its
calculations expects the lid to be closed. In fact, the manufacturers calibrate
the scanner and the software to work specifically with the exact color of the
underside of the scanner lid as a reference point (most often white). It is
also not expecting ambient light entering the scanning area.
Here are two identical scan, the only difference is one with lid open and one with lid closed; note the signifcant color shade differance.

If you are trying to get highly accurate dimensions of a stamp you should not place the stamp on the outer edges of the scanner glass (platen). Many scanners are “plug and play” and come bundled with software which allows you to modify images by making them 'sharper' or more 'colorful'. To generate the most accurate image of your stamp avoid using these software imaging enhancements.
Do not bother setting the scanner to scan at
48-bit color, use 24-bit color. While technically having more bits per channel
is better, you cannot see the difference becausemost monitors can only display 24-bit color. It is like
playing a Blue Ray movie on a standard definition TV. Additionally, the only
common 48-bit file format is TIFF. If you save the file in another format like
JPG it will convert the color channels back to 24-bit anyway.
Digital cameras and camera phones are one of the easiest way to produce digital images but performance and image quality can vary very widely. (For example, there is a significant difference between a consumer digital camera and a professional camera.) Digital camera are sometime very useful if you intentional need to take an angled image; a good example is to capture a grill on early US stamps. The camera angle will reveal the raised ridges of the grill better than a flat scan might. But in many cases you would want to limit any angle of the camera by holding it as close to 90 degrees as possible.
Image Resolution and Image Size
We have already described resolution as referring to the sharpness and clarity of a stamp image. This applies whether you are scanning a stamp, viewing a stamp image on a display, printing a stamp image.
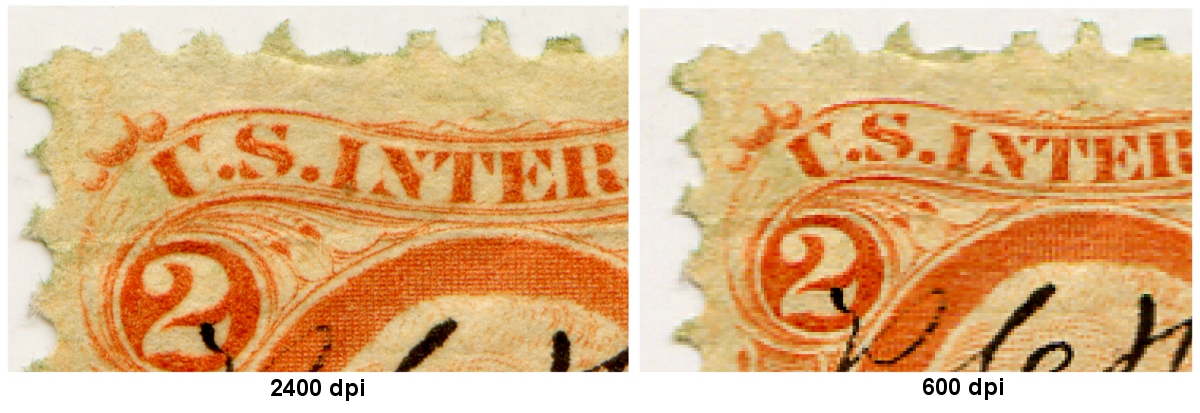
When scanning a stamp you are usually prompted to select a resolution to scan at. Typically you should not scan at less than 150 dpi but preferably 300 to 600 dpi; this generates a good quality image which can be used for many purposes. If you desire a very high quality image consider using the largest resolution your scanner can produce. But be aware of the difference between your scanners true optical resolution and the heavily promoted maximum resolution. Scanner manufacturers can advertise a much higher scanner resolution be adding what is called interpolated resolution. Interpolated resolution is simply a software enhanced resolution; it is no different than using software to greatly enlarge an image after scanning. Find out your scanners maximum optical resolution (in User's Guide or on box) and do not try to use anything larger.
Keep in mind the intended use of the image you are generating. In some cases you may only be generating a stamp image to email to someone of to post on a forum. In these cases there may be file size limits and you will need to scan at 150 dpi to keep the file size small. At other times, file size is not important to you and you may want to start with the highest quality image you can generate.
Using what we have learned, you can generate the highest quality image by using the maximum optical resolution and then saving in an uncompressed image file format like TIFF. Once you have a foundational high quality image saved, you can always make a new lower, small sized and compressed image like a JPG. But note that you cannot make a higher quality image but using a low dpi or compressed image by enlarging it without encountering pixelation.

If you know the pixel width and height of an image, this section will calculate the physical size (in inches) of the image when it is printed or displayed on various devices. To use the calculator, enter the width and height, then select the output resolution which will be used. * Most monitors display images at approximately 75DPI. To check your own monitor, use the chart above.


